How to do chain Replacement for Fixed-gear/Hub Gear Bicycles
Get to know your bike
All bicycles – whether fixed-gear or hub gear – will eventually need a new chain. Replacing the chain is not that complicated, and it’s important knowledge to have for bicycle maintenance. Start by checking your bike. Has it been a long time since you changed the chain? How far has the bike travelled since then, and most importantly, does the chain seem loose? Over time, the chain will stretch and the sprocket will wear down along with the chain. If the chain is very worn, you may need to also replace the sprocket, as it may have worn and stretched too much to function with a new chain.
Factors that impact the chain:
- Riding style and riding conditions
- External conditions (humidity, dirt, road salt)
- The seasons, especially the winter months
- Maintenance such as cleaning and lubricating the chain
What is needed for chain replacement?
The main things you will need for chain replacement are a chain splitter and a new chain.
- Chain splitter to cut the chain
- A suitable chain for fixed-gear/hub gear bike
Other items that are good to have:
- A repair stand for hanging the bike and to make the work easier
- A chain cleaning kit
- A pair of mechanic’s gloves
The bike chain and master link
A bicycle chain is a roller chain consisting of multiple interconnected links that transfer power from the pedals to the bike’s drive wheel and propel the bike forward. But to lock the chain ends together, a special link, called a master link, is needed. Master links come in different varieties, but we’ll talk about two common types in the following mounting instructions.
Master link with washer
This is a common master link for fixed gear/hub gear bikes. No special tools are required to lock the link.
Instructions: - Mounting a master link with washer.
Preparation
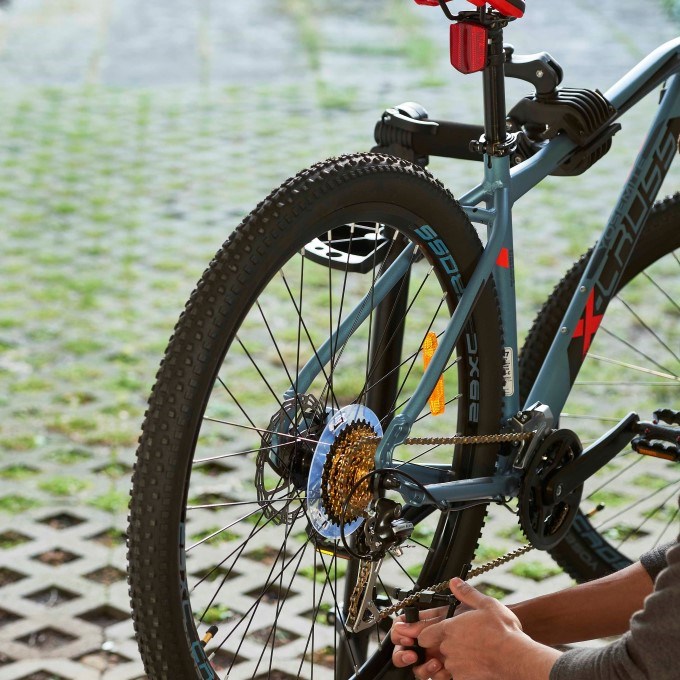
Let the bike stand firmly on the ground or hang it in a bike rack. Using the chain splitter to cut the chain to the correct length.
How to do it
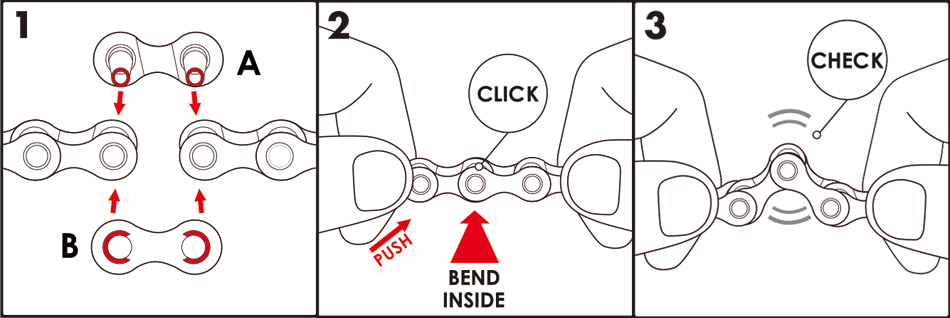
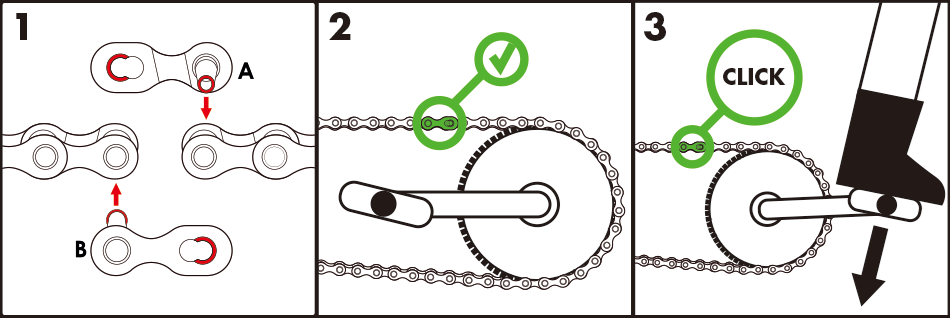
1. Connect both ends of the chain with the link pins (A). Place the outer washer on one of the link pins (B)
2. Then gently bend the chain inwards until the second link pin reaches the hole on the locking washer (B) and clicks in (A).
3. Check to ensure that the links can move in the master link.
Unlock
To unlock, bend the chain towards you as in point 2.
Masterlink with keyhole
Some fixed-gear/hub gear bicycles have this type of master link, but it is more commonly found on bikes with external gears. No special tools are required to lock this link either.
Mounting the slider on the master link with keyhole
Instructions: - Mounting the slider on the master link with keyhole.
How to do it
1. Attach A and B to each end of the chain and to each other so that master link is closed, but not locked.
2. Pedal forwards until the master link is at the top of the chain.
3. Leave the bike stationary and grip the handlebars. Press down on one pedal with your foot, as if you were riding off, and hold it until the master link clicks into place.
Unlock
Press the master link and open in the opposite direction to when you lock it, so that the master link opens. You can use master link pliers to facilitate this step.
Now that you have learnt about these two master links, you are ready to replace your first chain (see below):
Replacing the chain
Cut the old chain with the chain splitter – make sure to count how many links the old chain has. The new chain must have the same number of links. Cut the chain if necessary. (NOTE: Do not measure by comparing the length between the old and new chain. The old chain will probably be much longer because it has stretched. The risk is that you end up with a chain that is too long when you replace it.
Then continue to follow the steps above depending on the type of master link you have.
Maintaining the chain
How often you should perform chain maintenance varies greatly depending on how – and in what weather conditions – you use the bike. If you ride on gravel or muddy surfaces in wet weather, you’ll need more maintenance than if you ride on dry asphalt. The best thing is to clean and lubricate the chain regularly. Especially if it has become wet or dirty.
Basic maintenance
- Use a dry cloth and wipe the chain if it is wet after a ride.
- Use a brush to clean off dirt and grit.
NOTE! Never use strong cleaners and degreasers not designed for bicycle chains. These can damage your bike chain and dissolve the factory-applied grease in the hub.
Deep cleaning of the bicycle chain
Sooner or later, the chain will get soiled and start to blacken with dirt. It’s then a good idea to clean the chain with a specially designed bicycle cleaner. With a chain cleaning tool, you can clean the chain easily and thoroughly without having to remove the chain.
To best perform deep cleaning, we strongly recommend using a bicycle rack. If you use chain cleaning tool, attach it to the lower part of the chain and make sure that the chain is properly positioned in the chain cleaning tool’s bristles. Fill the chain cleaning tool with cleaner up to the specified maximum mark.
When the chain cleaning tool is filled with solvent, turn the cranks forward so that the chain runs through the chain cleaning tool. Once you have spun the chain enough times to have removed the dirt, detach the chain cleaning tool and pour the solvent into a separate container. (NOTE! Always check local regulations regarding the disposal of solvents.)
Rinse out the chain cleaning tool and fill it with soap, then repeat the process of attaching and cycling the chain through the chain cleaning tool until the chain is thoroughly rinsed. It is important to remove as much of the solvent as possible as it can affect the new lubricant you apply to the chain. While cleaning your chain, it’s a good idea to wipe down other parts of your drive system that may need attention.
Dry the chain with a clean, dry cloth and allow the chain to air dry until it is completely dry. Once the chain is dry, it is important to lubricate the chain again.
Use a suitable chain oil – there are oils intended for specific weather conditions. Apply a small drop to each individual rivet. Pedal through the chain so that the oil spreads, mainly in the chain rollers. Then use a clean, dry cloth to wipe off excess oil from the chain to prevent dirt from accumulating.